Traditional Georgian Dancing.
Traditional Georgian dancing.
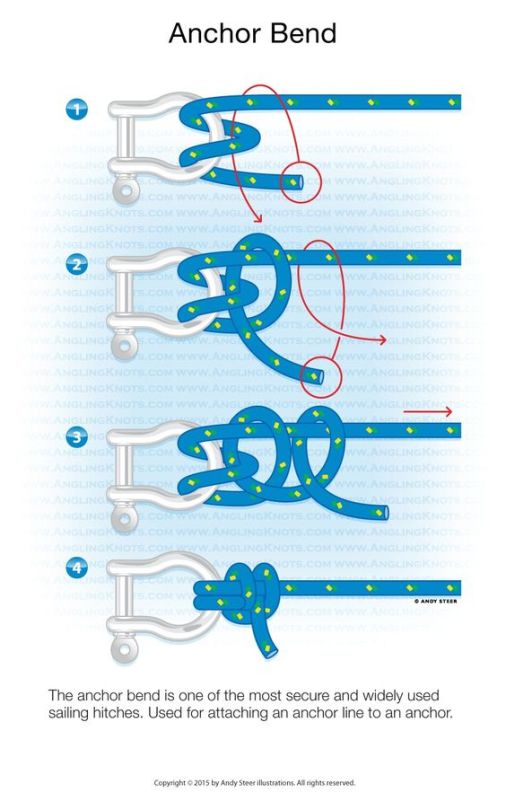
More Posts from Badkittos-spellandfolklore and Others


Lissajous curve table


When to use what in witchcraft -
Ok so I am gonna say this is my personal reference, its mainly through associations. You might TOTALLY disagree and thats chill!
Its more something to think about and a guideline of what I use myself…
Candle Magic:
Carve a candle when…. the candle represents the target, in sympathetic magic. When, essentially, the candle is a poppet and lighting it is a symbol of destruction or empowerment to the target.
Place something under the candle or before it when… you are doing general candle magic, when the candle represents empowering a wish, idea or concept.
Anoint the candle when… doing work with spirits and gods, when you mark the candle for a special purpose, when doing high magic.
Herbs and plant work:
Use dry herbs when… it is convienent to do so, when the herbs are out of season or when you need to store them in a jar or bottle for a long time.
Use fresh herbs when… the spell is very earth orientated, when doing magic on behalf of another or when the magic is sympathetic so that the herbs represent the target, within kitchen witchery.
Use flowers when… when the spell concerns love and sex, or perhaps fertility and attraction, due to flowers being the reproductive parts of the plant.
Use fruit when when… working with children as a target, or with children practising. When you work with fertility and abundance spells.
Use wood and twigs when… when the spell is for protection or binding, for hardiness.
Burn herbs (recaning/incense) when… you wish to cleanse or banish, or invoke an atmosphere - that being, for divination using herbs that are said to open up your perceptions, when banishing, burning acrid or pungent herbs.
Use oil infusions when… you wish to anoint something, when you wish to mark something permanently.
Use floral waters (rose water etc) when… dealing with spirits and gods, for glamour as it has a long history of being used to beautify.
Crystals:
Use metals (haematite, copper, ores etc..) when… you work in protection, when you do energy work due to the conductive properties of metal.
Use shell, pearl, coral and such when… you work in sea magic, when you work within emotional magic due to the element of water.
Use points when… you wish to direct magic to a target.
Use tumble stones when… you wish the magic to be gentle or manifest at a certain place on the body on a target.
Use geodes when… you work in protection, when you work with glamour aimed to obscure and hide.
Knot magic:
Use cotton when… it is convenient.
Use silk when… doing spells that benefit the target.
Use ribbons when… love spells and wealth spells, as well as confidence and beauty spells. Spells to ensure victory.
Use rope when… doing spells that aim to hurt or weaken the target, binding especially.
Poppets:
Use cloth when… the spell aims to benefit who the poppet represents, use particular care when sewing or cutting, choose colours that are appropriate to them.
Use wax when… you wish to manipulate the target.
Use clay when… wish to create fetches or servitors, when you wish to create permanency.
Use twigs when… you wish to bury or throw the poppet out, when you want the poppet to be easily destroyed by breaking or setting on fire.
Sigils:
Use an alphabet grid or circle when… you wish the sigil to be more random and less attached to you.
Combine the shapes of letters from a sentence… when your sigil is very specific and a short term goal.
Use your own personal symbols when… you want the magic to be connected to you, when it is personal.
Help! Someone is praying against me, what do I do???
everyone has some ain’t shit person in they life who wants to see them fail, even if it’s subconcious. a jealous friend, an entitled coworker, or ya shady ass aunty who can’t mind her damn business, we all have someone working against us
most curses amount to this, so before you start freakin’ out that some powerful rootworker or witch is mad at you, i have some tips to help you out
First notice the signs
do ya ears ring? itch? feel hot? is ya eye twitchin? do you keep havin dreams with a person who you not all that close to? did you get really hype for some good news and then it crumbled? even when it seemed like a for sure thing? then someone is prolly working against you
Figure out who it is
this can be difficult. narrow down the most likely aint shit people in ya life, pay attention to ya dreams, ask the house spirits and ancestors, or do a little divination. get a grasp of their energy.
Cleanse
but frfr get outcha Florida Water, double the salt, light all the herbs on fire, clean and cleanse your home, car, and any spaces you heavily occupy. cleanse and get rid of items connected to the person. take a long cleansing bath.
Banish
do a banishing spell, write the names of the people down and set them on fire, get the black salt out and sweep it out the door. banish their energy that is currently being directed at you. cleansing only gets rid of what is there currently.
BIND
remember, if you don’t bind them, the person will just keep sending those prayers and soft curses your way. silence them.
Prevention/Preemptive Strike
there are many ways to just eliminate the casual curses and prayers against you.
STOP TELLIN EVERYONE YA GATDAMN BUSINESS
Protection charms
Reflecting spells (real mirrors are good for this)
Sigils
Washing your doors
Protective and charged crystals
Cats
now go forth and handle that messy bitter bitch who’s tryna fuck up ya life 👌🏽
You can add pockets.
You can add pockets to anything with a side seam.
They can be big pockets.
Anything we want can have big pockets.
We have unlimited power. Over the side seam pockets.

There’s two steps: drafting the pattern and sewing the pattern. The pattern drafting is really quite easy:

I’m having trouble getting google drive to give me my pictures, so I traced over the foundation lines.
The first thing to make is the pocket template.
Draw a 10″ vertical line on your drafting paper.
Measure 1″ down from the top of the line, and draw a notch. This is notch #1.
Measure 6″ from the top of the paper, and mark it “x”
Measure 1″ down from X (7″ from top) and make a little mark to come back to later.
Measure 3″ down from that mark (4″ from x, 10″ from top) and you should be at the end of your line.
You have now drawn your vertical foundation line.
Draw a 3.5″ long horizontal line at the very top of the vertical line
Draw a 5″ long horizontal line that comes off the point you marked X.
Draw a 5″ long horizontal line that comes off the very bottom of the vertical line.
You should now have all the photoshopped in lines in my image, your foundation lines, on your paper.
You sort of eyeball in the curved lines. Starting at the mark you made to come back to later (7″ from the top of the line), draw in your pocket bottom. It’s just a little swoop that eventually touches the bottom foundation line. You also need to draw in the curve at the top of the pocket, to connect it to the middle horizontal line.
The good news is that if your foundation lines are right, you can go pretty nuts with eyeballing in the curves and still be in the right place. If the drafting was tough and you’re more a go with the flow kind of patterner, just look at my pattern and guess how you’ll want yours.
Make sure that you can see your notches at 1″ and 6″ from the top. You’ll need them.
Now you have your pocket template, and you need to turn it into three pattern pieces.

The first pattern piece is for the pocket front, and it’s very easy. Take your template, trace it onto a new piece of paper, and add 1/2″ of seam allowance on all sides. Make sure you transfer your notches.

(Sorry for that +/- thing there. I’m having trouble with google drive and I’m way too lazy to try to troubleshoot it when I could just take sloppy screenshots)
For the pocket back, trace your template onto a new piece of paper. Measure a vertical line in 1″ from your vertical foundation line. Erase the part to the left of that line, leaving you with a sort of slimmed down version of your front pocket piece. Add seam allowance all the way around.

Now you’re going to do the same thing you did with the pocket front, but keeping the smaller part. This is the pocket back.
So, trace your pocket template again, draw a line in 1″ from the vertical line, and then erase everything that’s to the right of the line. Then, add seam allowance along all the sides except the notched one. I drew over it in green hilighter so that you can tell which one. This is the skirt side seam extension.

Pattern drafting is done.
So, what’s with the funky flap? Effectively, what we have right now is a pocket front that’s made of one piece of fabric, and the same shape for the back that’s made of two different pieces of fabric. You’re going to add the skirt side seam extension to your skirt, and then sew the pocket back to this. This is going to hide your pocket opening.

This is going to make your pocket much less visible. This is important, because you will likely be making your pocket out of a different fabric than your finished skirt. If you made your skirt out of something expensive, especially custom-printed, it’d be a massive waste of money to use that fabric inside the pocket, where no one can see it. If you’re using a looser-woven fabric, like I did for this skirt, you need to make your pocket in something much tighter, smoother, and less likely to form holes. Quilt cotton is great for this sort of thing because it’s tightly woven and smooth.

Take the pattern for the back of your skirt, and tape the pattern for the side seam extension at the top of the side seam.
If you’re like me, and don’t use a pattern for your skirt, pin the extension on the side seam and then trim the side seam down everywhere else (just cut around the extension piece). For 99% of lolita skirts where you don’t use a pattern, losing 1″ on each side seam isn’t going to affect the overall poof.
Side note, I did this on a pleated skirt and pleated the fabric first. In a normal situation, you would do this with the fabric flat, and gather the waistband after the pockets are assembled.

Cut your pockets out of your pocket material. Yes, I was a terrible person and did one on the lengthwise grain and one on the crosswise grain. It’ll be fine.
Make sure that your notches are visible on both pocket pieces.

Now, line the top of your pocket front up with the top of your skirt, and sew your pocket along the horizontal seam. (if your pocket has a RS or WS, sew the pocket to the skirt front with right sides together). If you’re feeling like getting a gold star, press, grade, and understitch the seam.
Line the top of your pocket back up with the top of your skirt extension, and sew the pocket back to the skirt seam extension. Gold star for pressing, grading the seam allowance, and understitching the seam.
So, with two gold stars in hand, put the front and backs of the skirts together, right sides together, with the pockets sticking out.
Remember your bottom notch at the 6″ mark? Stick a pin there. You’re now going to sew from that pin all the way to the bottom of the skirt.
This might feel wrong at first, because it feels like you’re sewing the bottom inch or so of your pocket all the way closed. This a normal feeling, and you’re experiencing it because I just told you to sew part of your pocket all the way shut. The opening for your hand has to be shorter that the total length of the pocket, or else you won’t be able to put stuff in it without it falling out.

This will be roughly where the thicker pink line is.
Once you’ve sewn your side seam (leaving the pocket open, obviously), then you’re going to want to sew the pocket bag together. This is the purple line in my photo up there.
You might notice that my pocket sewing is a lot shorter than the pocket fabric. I sewed my pocket back piece on incorrectly and had to shorten the pocket or else it’d make a hole. Pockets are cool like that. If they’re a little off, no one but you will ever know.
I then did some extra reinforcing (did an extra seam around the outside of my stitching, and did a bit of extra machine tacking at the bottom of the pocket opening to make sure there weren’t rips developing in the future with wear.
So, then you can flip the skirt right side out and appreciate how nice your pocket is. There’s just one more thing:
When you put the waistband in, you’re going to need to take the top of the pocket bag (that little 3.5″ bit at the very top) and sew that into your waistband. As you sew your waistband, this will actually be pretty obvious that it needs to be done, because the waistband intersects with the pocket top. If this was a normal skirt, I’d say to do it now.
However, since this is lolita, you’re probably going to need to gather or pleat your skirt, and THEN sew the pocket top down. It’s just one more step: pull your gathers, get them to look pretty, and then run a line of basting to hold the pocket nice and neat along the top line. You don’t want to get the top of the pocket caught up in pleats or gathers, or you’ll have weird wrinkles in your pockets that hold lots of crumbs and feel gritty. Obviously this is the picture that I can’t get google docs to let me see, so if that’s confusing, bug me about it tomorrow and I’ll get that good picture up.

Here, you can see my pins holding the pocket top flat, and you might be able to see my line of basting that holds it in place. Once that basting is there, you can attach your waistband just like normal, and then you’ll have a pocket big enough to hold your smartphone and also some gum.
One last note: if you put really heavy things in your new pocket, make sure your petticoat can support the weight. There’s nothing that says that you can’t build a lolita skirt with pockets, but the laws of physics sometimes say what you can and can’t put in them without wrecking your poof.
Anyway, there we go, the MOST requested lolita tutorial I’ve ever gotten. My brain’s feeling a bit fuzzy and I’m sure I said something weird or that doesn’t make sense, but my askbox is open and I read every comment someone puts on a reblog, so feel free to tell me to clarify.

Natrix natrix
One of the three species of snakes in Finland, this one appears as a benevolent creature, a guardian for households and farms in folklore.
there are gods you’ll see on a warm summer day, when the sun is close and ripe, and the air smells like flowers in full bloom, and like young wine goes to your head
there are gods you’ll see when the snowy night has covered the world in a deep dark shroud and your soul is bare against the judgement of the stars
there are gods you’ll see when you look into the eyes of a stranger and catch a glimpse of a long forgotten lover, overflowing with promises of many sleepless nights
there are gods you’ll see when your heart boils with anger and your spirit fills with wicked desires, as red as blood and as blood sweet
there are gods you’ll see when the pain tears you like thorns and nettles, and there are gods you’ll see when loneliness burdens you like a heavy unwanted crown
there are gods you’ll see in songs, in the beating of the drums and of the hearts, in the shimmer of a mountain stream and the depth of the sea, gods of wolf’s howl and of the forest
there are gods you’ll see many times on your path, and there are gods you’ll see only once in your lifetime, gods you’ll be happy to see and those you’d rather forget
there are gods you’ll see in the dreams
gods you’ll see in the smoke
gods you’ll see in the mirror
whatever you do, don’t look at them too long.
-
 nobody-viii reblogged this · 1 month ago
 -
 backyard-beauty liked this · 2 months ago
 -
 poufwore liked this · 2 months ago
 -
 sugarfishies liked this · 2 months ago
 -
 telcontari reblogged this · 2 months ago
 -
 eunwonves liked this · 2 months ago
 -
 minanira1 liked this · 2 months ago
 -
 purpleplanttea reblogged this · 3 months ago
 -
 nooxly liked this · 3 months ago
 -
 ledbiantastic liked this · 3 months ago
 -
 oceanicdruid reblogged this · 3 months ago
 -
 silverthroatednightingale reblogged this · 3 months ago
 -
 knightofleo liked this · 3 months ago
 -
 psi-scribe liked this · 3 months ago
 -
 mrassassinscreedhimself liked this · 3 months ago
 -
 liamthegermandork reblogged this · 3 months ago
 -
 faithlike-potatoes reblogged this · 3 months ago
 -
 littlemeangreen reblogged this · 3 months ago
 -
 sharpmidnight reblogged this · 3 months ago
 -
 dysfunctionalburden liked this · 3 months ago
 -
 gundamthey17 liked this · 3 months ago
 -
 wooooooaaahhhhh-oooooops reblogged this · 3 months ago
 -
 icurlybooks reblogged this · 3 months ago
 -
icurlybooks liked this · 3 months ago
-
 endofragnarok reblogged this · 3 months ago
 -
 adventures-in-mangaland reblogged this · 3 months ago
 -
 asthmaticseamonster reblogged this · 3 months ago
 -
 imagine-a-name-here liked this · 3 months ago
 -
 lilithknight reblogged this · 3 months ago
 -
 foreveracharmedone reblogged this · 3 months ago
 -
 artghost-here liked this · 3 months ago
 -
 killermantidae reblogged this · 3 months ago
 -
 also-yelling-into-the-void reblogged this · 3 months ago
 -
also-yelling-into-the-void liked this · 3 months ago
-
 is-this-where-the-line-starts liked this · 3 months ago
 -
 the-fangirl-who-writes-and-draws liked this · 3 months ago
 -
 megadino706 liked this · 3 months ago
 -
 muppetjackrackham liked this · 3 months ago
 -
 wicked-ghoul reblogged this · 3 months ago
 -
 quinacridone-rose reblogged this · 3 months ago
 -
adventures-in-mangaland liked this · 3 months ago
-
 itsybitch liked this · 3 months ago
 -
 tryingtothrive2025 liked this · 3 months ago
 -
tryingtothrive2025 reblogged this · 3 months ago
-
 dragontrash11 reblogged this · 3 months ago
 -
dragontrash11 liked this · 3 months ago
-
 amo1999 liked this · 3 months ago
 -
 psychedelicpriest126 liked this · 3 months ago
