You Can Add Pockets.
You can add pockets.
You can add pockets to anything with a side seam.
They can be big pockets.
Anything we want can have big pockets.
We have unlimited power. Over the side seam pockets.

There’s two steps: drafting the pattern and sewing the pattern. The pattern drafting is really quite easy:

I’m having trouble getting google drive to give me my pictures, so I traced over the foundation lines.
The first thing to make is the pocket template.
Draw a 10″ vertical line on your drafting paper.
Measure 1″ down from the top of the line, and draw a notch. This is notch #1.
Measure 6″ from the top of the paper, and mark it “x”
Measure 1″ down from X (7″ from top) and make a little mark to come back to later.
Measure 3″ down from that mark (4″ from x, 10″ from top) and you should be at the end of your line.
You have now drawn your vertical foundation line.
Draw a 3.5″ long horizontal line at the very top of the vertical line
Draw a 5″ long horizontal line that comes off the point you marked X.
Draw a 5″ long horizontal line that comes off the very bottom of the vertical line.
You should now have all the photoshopped in lines in my image, your foundation lines, on your paper.
You sort of eyeball in the curved lines. Starting at the mark you made to come back to later (7″ from the top of the line), draw in your pocket bottom. It’s just a little swoop that eventually touches the bottom foundation line. You also need to draw in the curve at the top of the pocket, to connect it to the middle horizontal line.
The good news is that if your foundation lines are right, you can go pretty nuts with eyeballing in the curves and still be in the right place. If the drafting was tough and you’re more a go with the flow kind of patterner, just look at my pattern and guess how you’ll want yours.
Make sure that you can see your notches at 1″ and 6″ from the top. You’ll need them.
Now you have your pocket template, and you need to turn it into three pattern pieces.

The first pattern piece is for the pocket front, and it’s very easy. Take your template, trace it onto a new piece of paper, and add 1/2″ of seam allowance on all sides. Make sure you transfer your notches.

(Sorry for that +/- thing there. I’m having trouble with google drive and I’m way too lazy to try to troubleshoot it when I could just take sloppy screenshots)
For the pocket back, trace your template onto a new piece of paper. Measure a vertical line in 1″ from your vertical foundation line. Erase the part to the left of that line, leaving you with a sort of slimmed down version of your front pocket piece. Add seam allowance all the way around.

Now you’re going to do the same thing you did with the pocket front, but keeping the smaller part. This is the pocket back.
So, trace your pocket template again, draw a line in 1″ from the vertical line, and then erase everything that’s to the right of the line. Then, add seam allowance along all the sides except the notched one. I drew over it in green hilighter so that you can tell which one. This is the skirt side seam extension.

Pattern drafting is done.
So, what’s with the funky flap? Effectively, what we have right now is a pocket front that’s made of one piece of fabric, and the same shape for the back that’s made of two different pieces of fabric. You’re going to add the skirt side seam extension to your skirt, and then sew the pocket back to this. This is going to hide your pocket opening.

This is going to make your pocket much less visible. This is important, because you will likely be making your pocket out of a different fabric than your finished skirt. If you made your skirt out of something expensive, especially custom-printed, it’d be a massive waste of money to use that fabric inside the pocket, where no one can see it. If you’re using a looser-woven fabric, like I did for this skirt, you need to make your pocket in something much tighter, smoother, and less likely to form holes. Quilt cotton is great for this sort of thing because it’s tightly woven and smooth.

Take the pattern for the back of your skirt, and tape the pattern for the side seam extension at the top of the side seam.
If you’re like me, and don’t use a pattern for your skirt, pin the extension on the side seam and then trim the side seam down everywhere else (just cut around the extension piece). For 99% of lolita skirts where you don’t use a pattern, losing 1″ on each side seam isn’t going to affect the overall poof.
Side note, I did this on a pleated skirt and pleated the fabric first. In a normal situation, you would do this with the fabric flat, and gather the waistband after the pockets are assembled.

Cut your pockets out of your pocket material. Yes, I was a terrible person and did one on the lengthwise grain and one on the crosswise grain. It’ll be fine.
Make sure that your notches are visible on both pocket pieces.

Now, line the top of your pocket front up with the top of your skirt, and sew your pocket along the horizontal seam. (if your pocket has a RS or WS, sew the pocket to the skirt front with right sides together). If you’re feeling like getting a gold star, press, grade, and understitch the seam.
Line the top of your pocket back up with the top of your skirt extension, and sew the pocket back to the skirt seam extension. Gold star for pressing, grading the seam allowance, and understitching the seam.
So, with two gold stars in hand, put the front and backs of the skirts together, right sides together, with the pockets sticking out.
Remember your bottom notch at the 6″ mark? Stick a pin there. You’re now going to sew from that pin all the way to the bottom of the skirt.
This might feel wrong at first, because it feels like you’re sewing the bottom inch or so of your pocket all the way closed. This a normal feeling, and you’re experiencing it because I just told you to sew part of your pocket all the way shut. The opening for your hand has to be shorter that the total length of the pocket, or else you won’t be able to put stuff in it without it falling out.

This will be roughly where the thicker pink line is.
Once you’ve sewn your side seam (leaving the pocket open, obviously), then you’re going to want to sew the pocket bag together. This is the purple line in my photo up there.
You might notice that my pocket sewing is a lot shorter than the pocket fabric. I sewed my pocket back piece on incorrectly and had to shorten the pocket or else it’d make a hole. Pockets are cool like that. If they’re a little off, no one but you will ever know.
I then did some extra reinforcing (did an extra seam around the outside of my stitching, and did a bit of extra machine tacking at the bottom of the pocket opening to make sure there weren’t rips developing in the future with wear.
So, then you can flip the skirt right side out and appreciate how nice your pocket is. There’s just one more thing:
When you put the waistband in, you’re going to need to take the top of the pocket bag (that little 3.5″ bit at the very top) and sew that into your waistband. As you sew your waistband, this will actually be pretty obvious that it needs to be done, because the waistband intersects with the pocket top. If this was a normal skirt, I’d say to do it now.
However, since this is lolita, you’re probably going to need to gather or pleat your skirt, and THEN sew the pocket top down. It’s just one more step: pull your gathers, get them to look pretty, and then run a line of basting to hold the pocket nice and neat along the top line. You don’t want to get the top of the pocket caught up in pleats or gathers, or you’ll have weird wrinkles in your pockets that hold lots of crumbs and feel gritty. Obviously this is the picture that I can’t get google docs to let me see, so if that’s confusing, bug me about it tomorrow and I’ll get that good picture up.

Here, you can see my pins holding the pocket top flat, and you might be able to see my line of basting that holds it in place. Once that basting is there, you can attach your waistband just like normal, and then you’ll have a pocket big enough to hold your smartphone and also some gum.
One last note: if you put really heavy things in your new pocket, make sure your petticoat can support the weight. There’s nothing that says that you can’t build a lolita skirt with pockets, but the laws of physics sometimes say what you can and can’t put in them without wrecking your poof.
Anyway, there we go, the MOST requested lolita tutorial I’ve ever gotten. My brain’s feeling a bit fuzzy and I’m sure I said something weird or that doesn’t make sense, but my askbox is open and I read every comment someone puts on a reblog, so feel free to tell me to clarify.
More Posts from Badkittos-spellandfolklore and Others

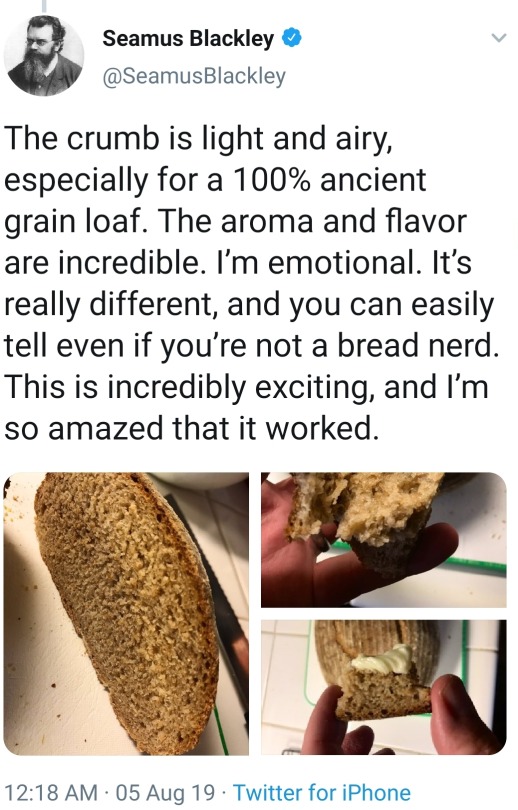
Scientist bakes sourdough bread with yeast derived from 4500 year old Egyptian pottery
i'm losing my mind @ this thread......historie......
eu·cha·rist
eat your gods.
EAT YOUR GODS. TEAR INTO THEM DEVOUR THEM LET ECSTATIC TEARS RUN DOWN YOUR FACE AND MIX WITH THE JUICE OF THEM.
get drunk on godflesh, stumble with divinity, whoop and shriek as they hit your bloodstream, roll in the dirt, suck their remnants off your gritty fingers, float, tumble, howl, chase, ascend, obliviate, transcend, transform.
wake disoriented, sick and aching with the loss of them. wipe your face, coax out your tangles, inspect your skinned knees and palms. leave your shoes where you threw them as an offering.
cultivate the hunger that only theophagy can sate.
consume them and be changed.
Breaking a Curse
Sooooo you’re not sure what’s going on in your life but you think you could be cursed? Luckily you have several options!
1. Burn a bay leaf at dawn and again at sunset. Allow the smoke to waft over you and when the leaves have finished smoldering scatter them in the wind.
2. Burn black salt. I personally like to write a small incantation on a slip of paper and use it to light the salt letting it all burn together.
3. Natural water. Enter a lake, stream, river, or other naturally occurring body of water. Water is extremely conductive and can easily carry away most curses or ill intent sent your way.
4. Take a bath with epsom salt and curse breaking herbs bay leaves, fennel, jasmine, sage, and nettles are all soild choices.
5. Clean your house with curse breaking herbs. Mop the floors, clean the windows, wash the doors paying attention to the threshold and when you’re finished throw the mop water out the back door.
These are a few of my personal favorites as far as beginner curse breaking in concerned! These aren’t for everyone and I caution you to take heed and practice with care!
Aishwarya Rai in Silsila Ye Chahat Ka from Bhansali’s Devdas (2002). The level of glamour and ethereal aesthetics of a girl keeping a lamp continuously lit for her love since being separated in childhood—

Polish Classics Aesthetics
Pan Tadeusz: summer days, the wind in the garden, fields of wheat, flower crowns, mysterious pasts, young love, hunting trips, white dresses, family secrets
Lalka: rainy days, old architecture, antique shops, one-sided love, academia, porcelain dolls, hopeless romanticism
Sklepy Cynamonowe: city streets at night, daydream illusions, teather curtains, old memories, the snow in the light of a street lamp, clock going backwards, suspicious stores, footprints leading nowhere
Dziady: dark academia, pagan rituals, old churches, ghosts of past lovers, magic, anger at god, starry nights
Wesele: dancing, long talks about politics, sacred items, being without control of ones body and mind, alcohol, fields at night, family issues, hoplessness, traditional clothing, drunken singing, prophesies, phantoms, historical figures
Kamienie Na Szaniec: crumbling buildings, secret meetings, guns and ammunition, bloody hands, dark tunnels, the sound of bombs, faith, spies
Kordian: witches and devils, mountains at night, tragic love, travelling across Europe, betrayal, self-discovery, patriotism, long monologues, conspiracy, mental hospitals, city squares, royal palaces, the shining of a blade, uncertainty, the sound of a running horse


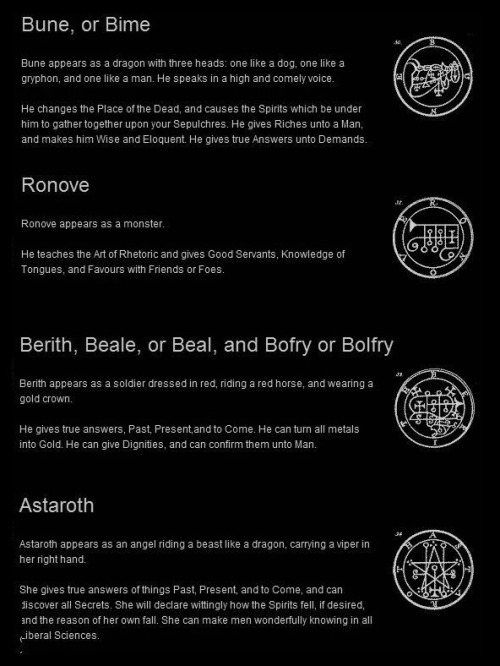


Goetic Sigils.

Celebrating Spitzer, One of NASA’s Great Observatories
As the Spitzer Space Telescope’s 16-year mission ends, we’re celebrating the legacy of our infrared explorer. It was one of four Great Observatories – powerful telescopes also including Hubble, Chandra and Compton – designed to observe the cosmos in different parts of the electromagnetic spectrum.
Light our eyes can see
The part of the spectrum we can see is called, predictably, visible light. But that’s just a small segment of all the wavelengths of the spectrum. The Hubble Space Telescope observes primarily in the visible spectrum. Our Chandra X-ray Observatory is designed to detect (you guessed it) X-ray emissions from very hot regions of the universe, like exploded stars and matter around black holes. Our Compton Gamma Ray Observatory, retired in 2000, produced the first all-sky survey in gamma rays, the most energetic and penetrating form of light.

Then there’s infrared…
Infrared radiation, or infrared light, is another type of energy that we can’t see but can feel as heat. All objects in the universe emit some level of infrared radiation, whether they’re hot or cold. Spitzer used its infrared instrument to make discoveries in our solar system (including Saturn’s largest ring) all the way to the edge of the universe. From stars being born to planets beyond our solar system (like the seven Earth-size exoplanets around the star TRAPPIST-1), Spitzer’s science discoveries will continue to inspire the world for years to come.

Multiple wavelengths
Together, the work of the Great Observatories gave us a more complete view and understanding of our universe.

Hubble and Chandra will continue exploring our universe, and next year they’ll be joined by an even more powerful observatory … the James Webb Space Telescope!

Many of Spitzer’s breakthroughs will be studied more precisely with the Webb Space Telescope. Like Spitzer, Webb is specialized for infrared light. But with its giant gold-coated beryllium mirror and nine new technologies, Webb is about 1,000 times more powerful. The forthcoming telescope will be able to push Spitzer’s science findings to new frontiers, from identifying chemicals in exoplanet atmospheres to locating some of the first galaxies to form after the Big Bang.
We can’t wait for another explorer to join our space telescope superteam!
Make sure to follow us on Tumblr for your regular dose of space: http://nasa.tumblr.com
Kind of gives you chills .
-
 judypudywudy liked this · 4 months ago
 -
 swordlady liked this · 5 months ago
 -
 thegoodlibrarian liked this · 5 months ago
 -
 malaayna reblogged this · 8 months ago
 -
malaayna liked this · 8 months ago
-
 luxaii liked this · 8 months ago
 -
 tomoyochisaki liked this · 9 months ago
 -
 dumbsouvenir reblogged this · 1 year ago
 -
 submerged-in-stories reblogged this · 1 year ago
 -
submerged-in-stories liked this · 1 year ago
-
 uzazi reblogged this · 1 year ago
 -
uzazi liked this · 1 year ago
-
 fluff-candy liked this · 1 year ago
 -
fluff-candy reblogged this · 1 year ago
-
 king-of-gay5000 reblogged this · 1 year ago
 -
king-of-gay5000 liked this · 1 year ago
-
 stilltoolazy liked this · 1 year ago
 -
 anyctibius reblogged this · 1 year ago
 -
 puffinsislandcatalog reblogged this · 1 year ago
 -
puffinsislandcatalog liked this · 1 year ago
-
 grich-witch liked this · 1 year ago
 -
 great-art-and-a-purple-tongue reblogged this · 1 year ago
 -
great-art-and-a-purple-tongue liked this · 1 year ago
-
 purpledorit0s liked this · 1 year ago
 -
 pizza-feverdream reblogged this · 1 year ago
 -
pizza-feverdream liked this · 1 year ago
-
 unsettledink liked this · 1 year ago
 -
 theinsanelycoolandzarming liked this · 1 year ago
 -
 yourcatsmom reblogged this · 2 years ago
 -
 shadowcatworld liked this · 2 years ago
 -
 follesegaskarth reblogged this · 2 years ago
 -
follesegaskarth liked this · 2 years ago
-
 marry-and-mirthful reblogged this · 2 years ago
 -
 treasonousoracle reblogged this · 2 years ago
 -
 a-jar-of-jelly reblogged this · 2 years ago
 -
 nerfherdingteleporter reblogged this · 2 years ago
 -
 leyney-13 liked this · 2 years ago
 -
 markismelarkis reblogged this · 2 years ago
 -
 onesillygoose liked this · 2 years ago
 -
 qurlycueued liked this · 2 years ago
 -
 ladywillowgrey reblogged this · 2 years ago
