Octopuses Are Smart! They Play With Toys, Pull Off Daring Escapes, And Are Masters Of Disguise. But They’re
Octopuses are smart! They play with toys, pull off daring escapes, and are masters of disguise. But they’re also smart in a lot of ways that the human mind probably can’t comprehend. For example, they basically have independent brains in their arms!
More Posts from Funscienceexperiments and Others

Materials: 1.jelly crystals 2.small cups 3.iron filings 4.calcium chloride 5.zip lock bag 6.water 7.adult Steps: 1.First, Fill one cup with 9 ounces of water 2. Next add a scoop of jelly crystals to the water and wait until the crystals are fully grown. ( The crystals are done growing when there is no more water in the cup) 3. Then add 4 tablespoons of the full-grown jelly crystals to a Ziploc bag 4. Next add 1 tablespoon of iron filings to the bag 5. Then, add a one and a half tablespoons of calcium chloride 6.next, mix everything in the bag by squishing the bag with your fingers 7.then, when everything is mixed, seal the bag 8.finally, squish and squeeze the bag to feel the heat coming out from it Lesson: When the water and Iron is contacted with air, rust is made with a byproduct of heat. Calcium chloride and water produces an exothermic reaction which starts the oxidation of the iron.
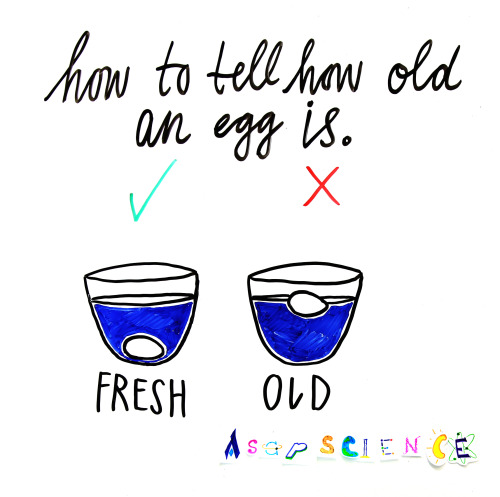
How to tell how old an egg is.
Egg shells are porous, so as they age, they absorb more air, making them float! But old doesn’t mean bad–before you throw out those floaters, crack ‘em open; if they smell and look like a normal egg, you’re in the clear.
Source: http://bit.ly/U5sHN3

Cat Fact
Cats have relatively few taste buds compared to humans. Domestic and wild cats share a gene mutation that keeps their sweet taste buds from binding to sugary molecules, leaving them with no ability to taste sweetness. Their taste buds instead respond to amino acids, bitter tastes, and acids.
Follow for more Cat Facts!

This gif shows mushroom sprouting. It’s so cool!
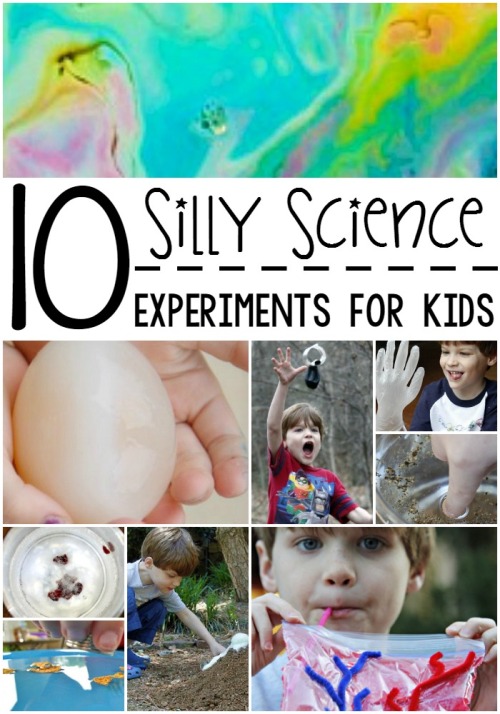
We love these Silly Science Experiments For Kids!
So You Want To Do a Microbiology Experiment At Home
…but you don’t have a microscope? Fear not my lovelies, I have heard your cries for science!
This is a nifty little experiment that takes very little work to set up, and can sit for weeks/months on a windowsill, happily incubating. Plus, it’s a great way to learn about microbes in the environment. It begins with mud, egg yolks, newspaper, and a Russian fellow by the name of Sergei Winogradsky.
As you probably already know, bacteria are everywhere. What you may not know is that bacteria are the foundation of every ecosystem. In school we learn that plants are at the bottom of the food chain. But plants can’t grow without bacteria in the soil- bacteria break down dead plants and animals, and take minerals from rock and nitrogen from the air and make them usable for plants. Bacteria represent a bridge between the nonliving/dead and the living.
Of course, we didn’t always know this. When people like Louis Pasteur first started studying microbes, they were concerned with two things: disease, and food spoilage. It was Sergei Winogradsky who first discovered that bacteria can perform a whole array of chemical processes, from converting nitrogen in the air into ammonia (very important for plants), to reducing sulfur (and making stinky swamp gas). For this reason, we think of him as the father of microbial ecology: the study of how microbes interact with each other and with their environment.
One method that Winogradsky used to study soil bacteria was to create a column of mud. At the top of the column there is plenty of oxygen and sunlight. At the bottom of the column, in the densely packed mud, there is no light, and oxygen gets used up very quickly. The result is that different kinds of microbes grow at different depths in the column, depending on their need/tolerance of oxygen and light. The really cool thing is that this growth can be seen with the naked eye, so you don’t need a microscope. Here’s how it works:
First, you need mud. About an equal mixture of mud and water, to be exact. Here’s mine, taken from a riverbank:

I actually ended up pouring off some of the water. You want to mix the two together so it’s kind of soupy.
Cut off the top of a two-liter soda bottle. You can use the top as a funnel, if you need it (I didn’t). Remove any labels so you can see what’s happening in the bottle as the experiment progresses.

Shred one full sheet of newspaper into little bits. Crush up some plain white blackboard chalk (about a teaspoon’s worth) and an egg yolk (old and stinky is a plus). Mix the newspaper, chalk, and egg yolk into your mud soup with a paint stirrer or something similar.

Delicious.
Now, scoop some of this fantastic concoction into your soda bottle. Tap it (covered!) on the table a few times to get everything to settle. Add more mud. Tap more. Repeat until your bottle is mostly full, then top it with some plastic wrap or a sheet of aluminum foil. Place it in a sunny spot.

Let your bottle(s) sit for 30 minutes or so. You should see a layer of water on top around an inch thick. You can pour some water off or add more if you need to.

Now, we wait! It will take a couple of weeks but eventually you will start to see distinct layers of different bacteria form in the column. Check up on it every week but otherwise don’t disturb the column- just let those little microbes work their magic.
We made six columns today, with mud from different locations. Each one will probably look a little different at the end of the experiment, because each will contain different species of microbes and different kinds of nutrients from the source mud. Feel free to make a couple of different columns to try this out yourself! I’ll be updating in several weeks/months (depending on how long ours take) to show you the results. Happy experimenting! Adapted from NASA Quest.

Materials: 1. A wooden skewer 2. A clothespin 3. 1 cup of water 4. 2-3 cups of sugar 5. A tall narrow glass
Steps: 1. First, clip the skewer into the clothespin so that it hangs down inside the glass and is 1 in from the bottom of the glass. 2. Next, remove the skewer and clothespin and put the aside. 3. Then, pour the water into a pan and boil it. 4. Next, pour ¼ cup of sugar into the boiling water and stir till it dissolves. 5. Then, keep adding more sugar, each time stirring until it dissolves. 6. Next, remove the heat and allow it to cool for 20 minutes. 7. Then, ask an adult to pour the mixture into the jar to the top. 8. Next, submerge the skewer into the glass so it is hanging straight down the miss without touching the sides. 9. Finally, put it somewhere where it would not be disturbed and wait for the sugar crystals grow over the next 3-7 days.
Lesson: When you mix water and sugar, you created a saturated mixture, which means that the water could only hold the sugar if it was very hot. As the water cools, the sugar turns into crystals on the skewer.

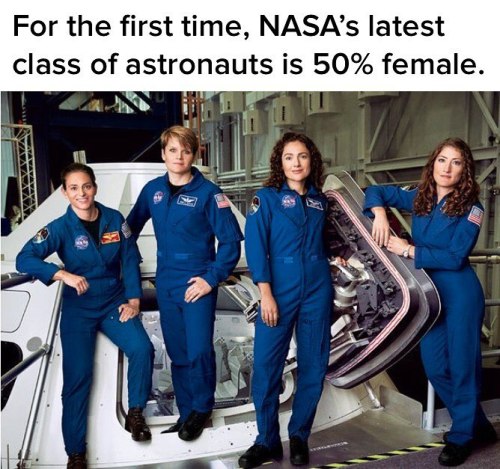
The new class of NASA astronauts if finally gender-balanced: 50% are women. What’s more — this class might be the one that gets to fly to Mars. (📷: @glamourmag)
Follow the-future-now on Tumblr and Instagram


Not all shadows are black. The Colored Shadows exhibit is a discovery of the colors hidden in white light. Red, green and blue spotlights shine on a wall. The wall is white because red, blue and green light combine to make white light. These colors are often called the additive primary colors. As you walk (or dance) between the lights and the wall, your body casts three different shadows.
-
 handfulofdust06 liked this · 4 years ago
 -
 babyvet-blog1 liked this · 6 years ago
 -
 nixnax liked this · 7 years ago
 -
 thearkinspace liked this · 7 years ago
 -
 low-level--00 reblogged this · 7 years ago
 -
low-level--00 liked this · 7 years ago
-
 doctoroctopus1996 liked this · 8 years ago
 -
 bara-titti3s liked this · 8 years ago
 -
 chiami-jishin reblogged this · 8 years ago
 -
 ironlightmoon-blog reblogged this · 8 years ago
 -
ironlightmoon-blog liked this · 8 years ago
-
chiami-jishin liked this · 8 years ago
-
 anne-apolis reblogged this · 8 years ago
 -
the-redheaded-harlot liked this · 8 years ago
-
 soulless-blunder reblogged this · 8 years ago
 -
idonotliketheconeofshamesblog reblogged this · 8 years ago
-
 cheesewhizexpress reblogged this · 8 years ago
 -
 herzogcrybaby-blog liked this · 8 years ago
 -
 wolfofromania liked this · 8 years ago
 -
 88y53 liked this · 8 years ago
 -
 lazyroughdrafts liked this · 8 years ago
 -
 morehomestucktrash reblogged this · 8 years ago
 -
morehomestucktrash liked this · 8 years ago
-
 valiantfanobservation-blog liked this · 8 years ago
 -
 superblyeffective liked this · 8 years ago
 -
 devasyalove reblogged this · 8 years ago
 -
 literallyacheesecurl liked this · 8 years ago
 -
 funscienceexperiments reblogged this · 8 years ago
 -
 sixthrangerknight reblogged this · 9 years ago
 -
 oshinytomato reblogged this · 9 years ago
 -
 jayyyquaza liked this · 9 years ago
 -
 alejandro912011 liked this · 9 years ago
 -
 lithanine liked this · 9 years ago
 -
 fredscience-blog reblogged this · 9 years ago
 -
 ivanatree liked this · 9 years ago
Hi everyone! I'm Ashley P. and I'm a Girl Scout who wants to make a difference in the world. Currently, I've been working on my Gold Award Project, which is a project where Girl Scouts solve an issue in their community to earn the Gold Award. The Gold Award is the highest award a Girl Scout can achieve. In my project, I'm addressing the issue on how there are a lack of women in the STEM field by creating a program to do fun science experiments with younger girls. Also, I constructed this blog for parents and children to do exciting and simple experiments with their kids to spark a passion in this subject like what happened to me as a child. I hope you enjoy and try to accomplish the experiments I post! Also, please have adult supervision while completing these experiments.
210 posts