How To Make A Lava Lamp At Home
How To Make a Lava Lamp At Home
How to do it? Watch the whole video: https://www.youtube.com/watch?v=rCY02sxwxmA
More Posts from Funscienceexperiments and Others

Materials: 1. Food Coloring 2. Liquid Dish Washing Soap 3. 3 Tablespoons of Warm Water 4. 1 Tablespoon of Dry Yeast 5. 1/2 cup of 20-volume hydrogen peroxide from a hair salon 6. Empty 16 ounce Plastic Bottle 7. Small Cup 8. Safety Goggles 9. Tray Steps: 1. First, put on your safety goggles and place a tray in front of you. 2. Next, pour the hydrogen peroxide in the bottle. (Make sure to have an adult complete this step) 3. Then, add 8 drops of any food coloring of your choice in the bottle. 4. Next, add 1 tablespoon of liquid dish soap into the bottle and swish it to have the materials mix. 5. Then, combine the warm water and yeast together in a separate small cup and mix for 30 seconds. 6. Finally, place the bottle in the tray and pour the yeast water mixture into the bottle. Lesson: While doing this experiment, foam appears having each tiny foam bubble filled with oxygen. The yeast acted as a catalyst or helper to remove the oxygen from hydrogen peroxide. If you touch the bottle, you notice that it is warm. That means your experiment made a reaction called exothermic reaction because it creates heat.
Today we learned from this video by Leslie Hutchings that Hoover Dam is so awesomely huge that its structure creates an updraft so strong that water poured over the side of the dam flies upwards in the wind instead of flowing down:
[via Sploid]
For NASA, Earth Day is Every Day!
With a fleet of spacecraft orbiting our home planet collecting data on everything from the air we breathe to natural disasters that impact our lives, Earth is always in focus. Join us as we celebrate our home with beautiful views from our unique vantage point of space.

On December 17, 1972, the crew of Apollo 17 snapped this iconic image of planet Earth. Dubbed the Blue Marble, this image was taken as Apollo 17 rocketed toward the moon.

On the way to the moon or from the surface of Mars, our spacecraft have photographed the beauty of Earth from many vantage points. In this image, the most powerful telescope orbiting Mars captured this view of Earth and its moon, showing continent-size detail on the planet and the relative size of the moon. The image combines two separate exposures taken on November 20, 2016, by the High Resolution Imaging Science Experiment (HiRISE) camera on our Mars Reconnaissance Orbiter.

In this image taken on July 19, 2013, the wide-angle camera on our Cassini spacecraft captured Saturn’s rings and our planet Earth and its moon in the same frame.
Our Suomi-NPP satellite also observed the Earth at night. Earth’s “night lights” often have a gee-whiz curiosity for the public , but have also served as a tool for fundamental research for nearly 25 years. They have provided a broad, beautiful picture, showing how humans have shaped the planet and lit up the darkness.
You can be mesmerized by the constant swirls in these visualizations of ocean currents. The swirling flows of tens of thousands of ocean currents were captured using the largest computations of their kind ever undertaken, using high-end computing resources at our Ames Research Center.

We’ve all seen iconic photographs of Earth shot by astronauts. But even satellites and robotic spacecraft often get in on the act. The above image, called “Pale Blue Dot,” was taken Voyager 1 in February 1990 from a distance of 4 billion miles.
Our satellites do more than take pretty pictures of Earth. They do everything from measure rainfall to observe weather patterns. The ten satellites in the Global Precipitation Measurement Constellation have provided unprecedented information about rain and snow fall across the entire Earth. This visualization shows the constellation in action, taking precipitation measurements underneath the satellite orbits.

In an homage to Apollo 17′s “Blue Marble” image, Suomi-NPP, a joint NASA-NOAA Earth-observing satellite, made this composite image, by making a number of swaths of Earth’s surface on January 4, 2012.
What’s your favorite aspect of planet Earth? These kids have their own ideas. You can even “adopt” parts of the planet. Which one of the 64,000 locations will you get?
Our home planet is constantly changing, which is why our fleet of Earth-observing satellites continuously monitor the globe, recording every moment of what they see. Luckily for us, many of the views are not only deeply informative but also awe-inspiring.
Make sure to follow us on Tumblr for your regular dose of space: http://nasa.tumblr.com
FACT #3: Why Does the Earth Only See One Side of the Moon?
Keep reading


DIY 1 Ingredient Rock Candy Tutorial from Growing a Jeweled Rose. When listing ingredients I do not count water as an ingredient. This is such a fun experiment for kids and if it doesn’t work you are out the cost of sugar.

![A Fun Way To Visualize Color Wavelengths. =]](https://64.media.tumblr.com/a2756238f055bd250dc9d85c638f19b1/tumblr_n5x7mo6Uvn1qfqbgho1_500.gif)
A fun way to visualize color wavelengths. =]

GOING “GREEN” IN THE ARCTIC
The growth of vegetation in Arctic climatic regions may begin to resemble that of more temperate and tropical regions. Researchers from NASA and Boston University conducted a 30-year study based firmly on satellite information to make this assertion.
Keep reading
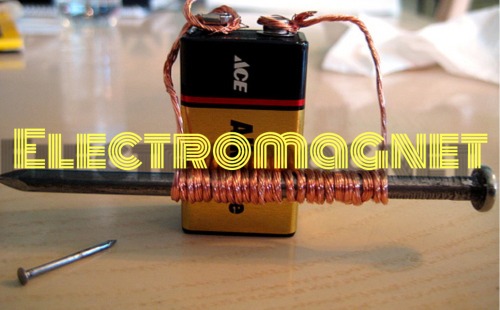
Materials: 1. A D size battery 2. Paper clips 3. 3 feet of thin coated copper wire 4. A 3 inch large iron nail Steps: 1. First, leave 8 inches of wire at one end and wrap most of the rest of the wire on the nail ( do not overlap the wires). 2. Next, leave 8 inches of wire at the other end of the nail. 3. Then, remove an inch of the plastic coating from both ends of the wire and attach one end of the wire to one end of the battery and the other wire to the other end of the battery. 4. Finally, put the nail near the paper clips and it should pick them up! Lesson: Magnets that cannot be turned off like ones on our refrigerators are called permanent magnets. Since the magnet we made can be turned off and on, it is known as an electromagnet. They run on electricity and are only magnetic when the electricity is flowing through the wires, which has the molecules in the nail attract to the metal paper clips.

-
 colorfulcollectorpirate liked this · 2 years ago
 -
 daddymac0523-blog liked this · 8 years ago
 -
 djames71us-blog liked this · 8 years ago
 -
wanewane1963 liked this · 8 years ago
-
firstpersonotaku liked this · 8 years ago
-
 askshadowgearversion3 liked this · 8 years ago
 -
ricardo3-blog1 liked this · 8 years ago
-
traverselincoln-blog liked this · 8 years ago
-
andylam24 liked this · 8 years ago
-
 xayyaan-blog liked this · 8 years ago
 -
lazzymuffin223 liked this · 8 years ago
-
tommyiscool123-blog liked this · 8 years ago
-
thecodystuff reblogged this · 8 years ago
-
thecodystuff liked this · 8 years ago
-
 arrested-developmemes liked this · 8 years ago
 -
iknow74 liked this · 8 years ago
-
eaglederp reblogged this · 8 years ago
-
 kingjoker-darwin-blog liked this · 8 years ago
 -
 funscienceexperiments reblogged this · 8 years ago
 -
 jimmykeelo liked this · 9 years ago
 -
 arnim liked this · 9 years ago
 -
 lovedrinkingwinekillingtime liked this · 9 years ago
 -
 aestheticseagull liked this · 9 years ago
 -
 playmyway-blog liked this · 9 years ago
 -
 somecallmetracy liked this · 9 years ago
 -
 renoe liked this · 9 years ago
 -
 jonnovstheinternet liked this · 9 years ago
 -
 fantasias-creativebubble liked this · 9 years ago
 -
 ongoingdisaster liked this · 9 years ago
 -
 its-bro-bro-bro liked this · 9 years ago
 -
 peterfromtexas reblogged this · 9 years ago
Hi everyone! I'm Ashley P. and I'm a Girl Scout who wants to make a difference in the world. Currently, I've been working on my Gold Award Project, which is a project where Girl Scouts solve an issue in their community to earn the Gold Award. The Gold Award is the highest award a Girl Scout can achieve. In my project, I'm addressing the issue on how there are a lack of women in the STEM field by creating a program to do fun science experiments with younger girls. Also, I constructed this blog for parents and children to do exciting and simple experiments with their kids to spark a passion in this subject like what happened to me as a child. I hope you enjoy and try to accomplish the experiments I post! Also, please have adult supervision while completing these experiments.
210 posts