My First Anatomy Tutorial! How I Connect Arms To The Torso. Simplified The Muscles For Better Comprehension


My first anatomy tutorial! How I connect arms to the torso. Simplified the muscles for better comprehension
PS. Pectoral is misspelled as “pectorial” in the picture! Don’t make that mistake haha
More Posts from Aether1984 and Others
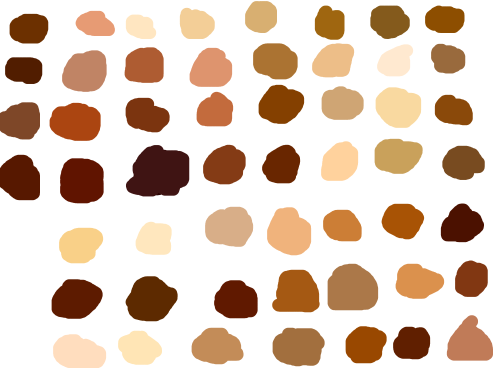
skin color ref because some of yall non-black poc and whites keep fucking up as if yall don’t know there’s other shades of brown when u racebend for woke points or something
(non-black artists please reblog)
I struggle INSANELY with doing 3/4 view art. Do you have any tips? I've found a couple guides on pinterest but I'm still having a little trouble.
Hi Anon! So sorry to hear you’re struggling. 3/4th is my favorite comfort zone, but I don’t know how well I can walk you through it any better than the many tutorials out there. There are plenty that do tutorials much better than me and they all kind of follow the same format for 3/4th view, but I’ll try my best to break down my method as understandably as possible!
1: I always start with my eye and middle line guide in whatever direction I want them facing. The middle one is more important than the original eye line.

2: Next I’ll do my head circle to keep my skull guideline and connect it to the bottom of my middle guideline to make the jaw. You’ll want to be kind of careful about this part and not just draw a gigantic circle or one that’s too small. Try to keep it about the size you want your actual head.
Don’t worry too much about the eye line at this point as you’re mostly getting the general shape of your head at this point. You can always edit your eye line later and adjust it to where you need it to be.
If you’re doing a character that has defined cheek bones (Like Vaard who has CHEEK BONES) you can do a line from the side of the head to the side of the chin like I did here that always acts as a great guide to the general area if you’re going to define it.
Make sure this step is on its own layer separate from the rest of your lines.

3: Now using your line and circle guide, go ahead and fill out the far side in whatever shape your character’s face is (angular, round ect.). It’s easiest starting from the top of your brow bone. Keep in mind your center line as this is your direct center of the face.
Vaard’s got a pretty basic, generic face shape as a base. It’s very sharp and square so I did a lot of straight lines with little to no curves to them.
At this point, it’s best to have a reference of a face in the shape you’re going for if you struggle with this step. References are your friend when stepping into unknown territory and angles.
You can also add your hair line guide as well to make sure it’s not too high or too low.
See how the circle we started with now becomes the full skull and makes up the back? This is why we want to be careful about the placement earlier and not go way out of the anatomy you’re going for.

4: Ok now for the fun part. What I like to do, is draw little Star Trek badges under the highest point of the brow you’re going for and on the far side, connect it to the cheek. This becomes your brow/cheekbone on the far side, and your inner eye socket guide on the inside. Don’t worry if they’re too big, you can always erase them later but we’ll come back to these in a bit. You just want the top to be fairly even with each other.

5: So to help line up your eyes in ¾ths view, you can draw a line from each side of the chin or nose. The inner corner of the eyes will usually sit near or close to the same line as the nostril or chin edges. (unless you’re drawing a very narrow or very wide nose, then go with the chin guide lines instead).
My original eye line didn’t quite line up with were I wanted to actually put my eyes but it pretty much lined up with the bottom inside corners so I kept it where it was.
Using the outside ‘Star Trek Badge’ just carry that top line on down and bam, nose bridge perspective!

6: Now using those badge shapes still, you can go ahead and curve your eyebrows right on top of the lines and you have your brows! This really only works if you’re going for a neutral expression though with little to no brow movement or expression.

7: From this point, it’s just a matter of adding your details! You already have a fairly solid base and anything at this point is very easily tweaked or shifted.

8: At this point you can erase all of your guide lines (which should be on a separate layer from your actual face outlines.) and if you happen to have a character with fairly deep set eyes, you can use those badge guides again to shade the eye sockets. Just shade inside them and you have some decent shadow guides.

I hope this helped some! Sorry if it looks like most other tutorials and guides out there, but I did my best. Remember, references are your friend when doing angles you’re not familiar with, even if it’s taking a picture of your own face just to see where shadows fall or how the nose looks at that angle! (The other eye is also the worst. I am in no position to give tips on the other eye, sometimes I don’t even draw it lol).
Best wishes and wishing you the best of luck as you learn to draw in ¾ths! It’s one of the most fun angles to draw once you get the hang of it!

so no one really asked for it and it doesnt have particularly anything to do with demitale but i made a little sketche tutorial on how i draw clothing as well as arm muscles u-u hope this is helpful to you guys as well!

Long time no see Tumblr. Quick guide on coloring deeper skin tones
The way you draw men is really good, I noticed in your post where you drew some of the trolls as gems. How do you go about constructing a male body? What's your sketching process? You also give Eridan an interesting face shape to accommodate his glasses. I'm very curious about your sketch process and your art in general!
Thank you!
I scribbled a quick thing to show you how I generally think when I draw… Disclaimer, my style is quite stylized, so in no way is my art accurate to real life nor should be used as a source material for accurate anatomy. 😂 Rather, this is a tutorial on how I conceptualize the human body when I draw it…
Usually when i draw bodies (not just masculine types), I usually conceptualize the torso into three “chunks.” What’s important about how to conceptualize these though, is understanding the volumetric shapes these take on and also where these chunks “end.”
Below is an example of my take of a muscular body type with a strong triangular silhouette. The goal below was to emphasize on a strong, confident, and yet also appealing stature. I also put my emphasis on things I find personally attractive lol \o/

The red area encompasses the general shoulder and breast area.
The green area is an indicator for the rib cage. (In some instances it would be better to draw the rib cage first because breasts overlap the ribcage.)
The blue area encompasses the rest of the stomach area. Technically the pelvic bone rises a bit higher into this area too, but for the sake of simplification to understand the basic shapes didn’t draw it in the above example.
Here’s how it generally applies to some other body types!

I don’t always draw like this sometimes, but i think it’s a good start on how to conceptualize the body into simpler shapes.
Also, for much more lanky body types, I tend to simplify them moreso since they don’t need as much definition on muscle structure.

Please do remember it’s better to understand how to simplify the human body after doing studies of anatomy from real life!! I can’t emphasize enough how important studies are
As for how I draw faces, I’ll save that for topic for a rainy day 😂 Hope this helps!

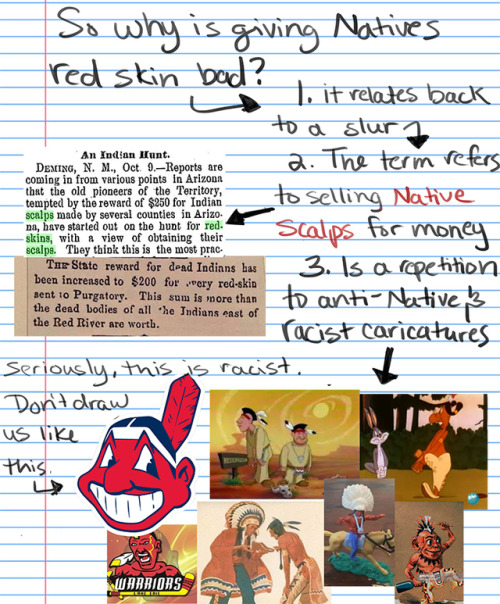
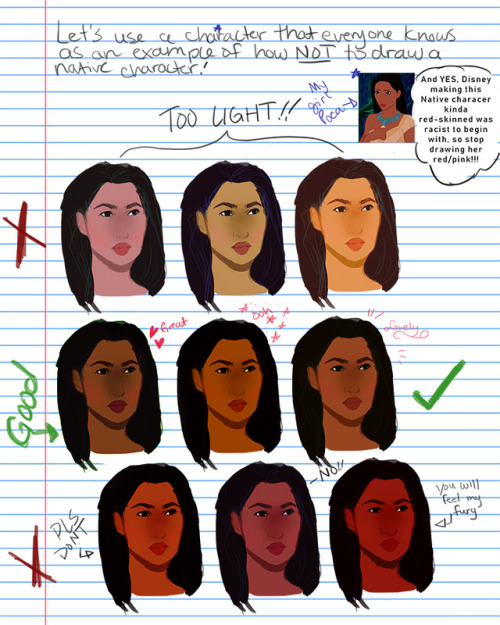
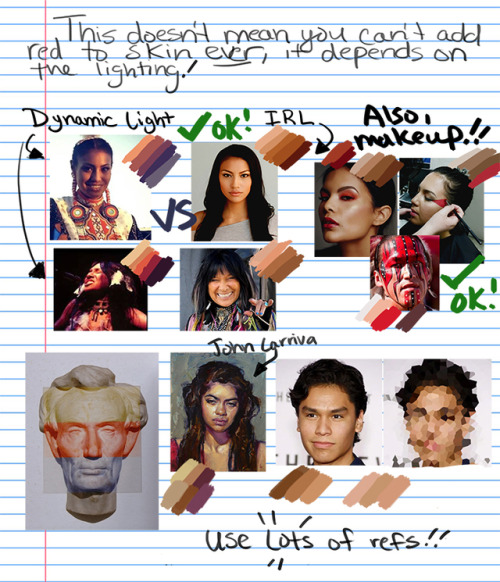
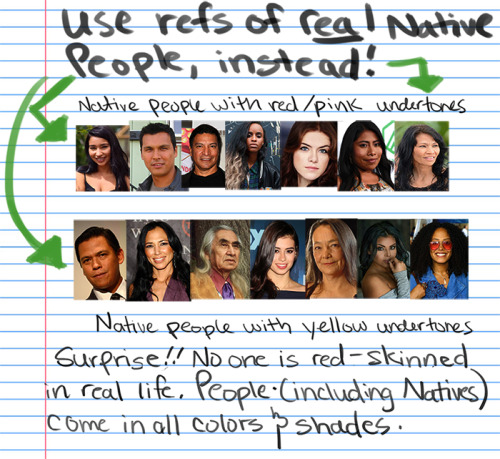
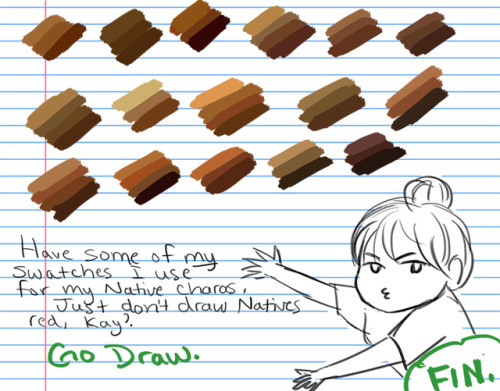
How I draw skin Part 2: DON”T DRAW NATIVE PEOPLE WITH RED SKIN!!!! A tutorial
For the first tutorial on how I draw skin, see the post here.
But seriously, I’ve seen too many drawings of Native characters with literal red/pink skin to count so just in case some of you are having troubles with drawing Native people, I’ve provided a guide for you. Please take my swatches if it helps!! and no more red skinned people, please <0<

Can we c̸̡̢͎̦̖̈́ ą̷̦̩̼͎̜̓̑̄̔́͝ͅͅͅ n̷̨̝̯̙̤͆̈̇́ͅ c̴͕͓̰̦̪̭͎͖̠̋͒̀͜ ę̷̧̙͖̼̘̦̬̦̺̈͒͆͊͝ l̵̜͉͓̥͊̑͛̚̕ shoulders?
They have no right to be this hard to draw.

Hell yeah' more shitpost drawing studies'
I mostly to these scribbles/notes for myself, but sharing is caring and my brain simple won't acknowledge and comprehend how light works.
It's actually so simple doing shadows ( in theory ), still' i wanna rip and tear at my hair whenever i actaully have draw dynamic ones.
could you do a body tutorial please? i always get stuck on the shoulders once ive drawn the head because they always look so board? i’m sure id struggle with the rest of the body too but once i fail with shoulders i usually give up and just draw creepy floating heads...
ooofok so
I’m gonna make u a shoulder tutorial cause a full body tutorial would be absolutely gigantic.ok so u got ur head right, i’m going for a straight forwards view point on this so

there they arenext is the neck, i typically make this thinner than the jawline and bring the length down so that the chin falls about half way between the jaw and the slope of the shoulders.
next i draw the slope of the shoulder on both sides and connect them with a horizontal line. The horizontal line is where you’d put the collar bones.I draw the slopes so that they extend past the ears. I tend to angle them at 45 degrees when standing normally.

I use this bit to quickly sketch in the collar bones and the tendons (?)the actual shoulder joint though i draw as round with a kind of, rounded corner????? both sides are p much even on each joint. I draw the joint as roughly the same width and the shoulder slope.I am god awful at maths so this bit doesn’t add up but it kinda ends up looking as if it’s split into thirds.
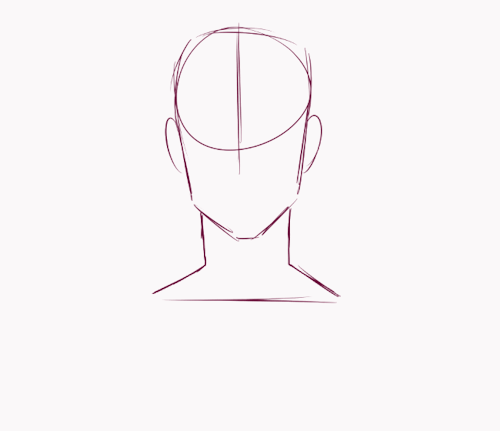

as u rotate the shoulders they over lap each other but the basic elements are still there, just shortened or behind something.

i’m not great at explaining shoulders all that well but i hope this helps at least somewhat.
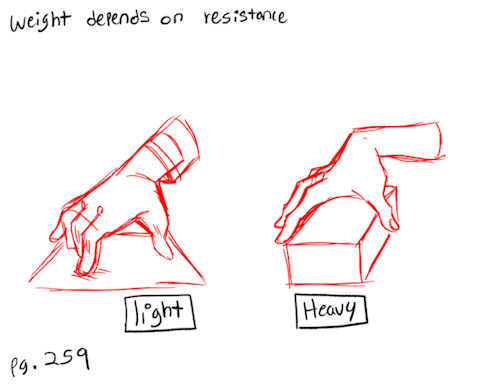
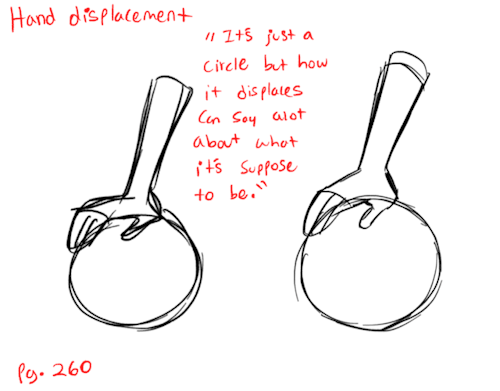
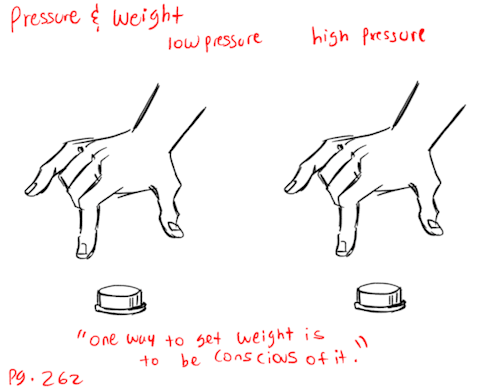
Notes from “The Animator’s Survival Kit” book.
[Pg.259 - 265] This is the end of my book studies. I’m pretty proud to have gotten through it and do a handful of the exercises. But this is only step one, I’m moving onto more advance animation techniques and will be posting those as I complete them. At the moment I’m currently wrestling with Toon Boom, so we’ll see how that goes.
——————- Tools: Rough Animator - Ipad + Apple Pen Patreon: [patreon.com/lunaartgallery] Twitter: [@LunaArt_Gallery] Instagram: [@lunaartgallerys]
-
 littlescraf liked this · 1 month ago
 -
 mertonmerts217 liked this · 1 month ago
 -
 ethanmorningstar liked this · 1 month ago
 -
 sketchedasclepion liked this · 1 month ago
 -
 missalys1a liked this · 1 month ago
 -
 rainyramblesscramble reblogged this · 1 month ago
 -
 butch-cryptid liked this · 1 month ago
 -
 art-guide-collection reblogged this · 1 month ago
 -
 quill-boop liked this · 1 month ago
 -
 casualtrashwerewolf liked this · 1 month ago
 -
 rimeoffrost liked this · 1 month ago
 -
 drawbridges4cats liked this · 1 month ago
 -
 roacquiesces liked this · 1 month ago
 -
 babblerofwunder liked this · 1 month ago
 -
allwithinilly liked this · 1 month ago
-
 lambsoul liked this · 1 month ago
 -
 aurorezell liked this · 2 months ago
 -
 cr1m3ly liked this · 2 months ago
 -
 matt-the-second-coming reblogged this · 2 months ago
 -
 maximates liked this · 2 months ago
 -
 sylphofsoul reblogged this · 2 months ago
 -
paulbettner-blog liked this · 2 months ago
-
 skelegrimm liked this · 2 months ago
 -
 warmchrysanthemum reblogged this · 2 months ago
 -
 glassismadeofme liked this · 2 months ago
 -
 slightlycheerful reblogged this · 2 months ago
 -
 cureazure liked this · 2 months ago
 -
 sunflowerseals reblogged this · 2 months ago
 -
 entering--hyperspace liked this · 2 months ago
 -
 piperihardlyknowher liked this · 2 months ago
 -
 zak-falls liked this · 2 months ago
 -
 lootboxing liked this · 2 months ago
 -
 comrade-schlau reblogged this · 2 months ago
 -
 tree-mans liked this · 2 months ago
 -
 tzimiscecatgirl liked this · 2 months ago
 -
 queenofnot liked this · 2 months ago
 -
 njikeartist liked this · 2 months ago
 -
 hydrasbane1 liked this · 2 months ago
 -
 butheresthetransitioner liked this · 2 months ago
 -
 shiftergod liked this · 2 months ago
 -
 lapiscatforeskin reblogged this · 2 months ago
 -
lapiscatforeskin liked this · 2 months ago
-
 ferventscape reblogged this · 2 months ago
 -
 felis-atra liked this · 2 months ago
 -
 swimmingbirdrunningrock reblogged this · 2 months ago
 -
swimmingbirdrunningrock liked this · 2 months ago
-
 aelthriel liked this · 2 months ago
 -
 raven-black-2023 liked this · 2 months ago
 -
 psychocatnip liked this · 2 months ago