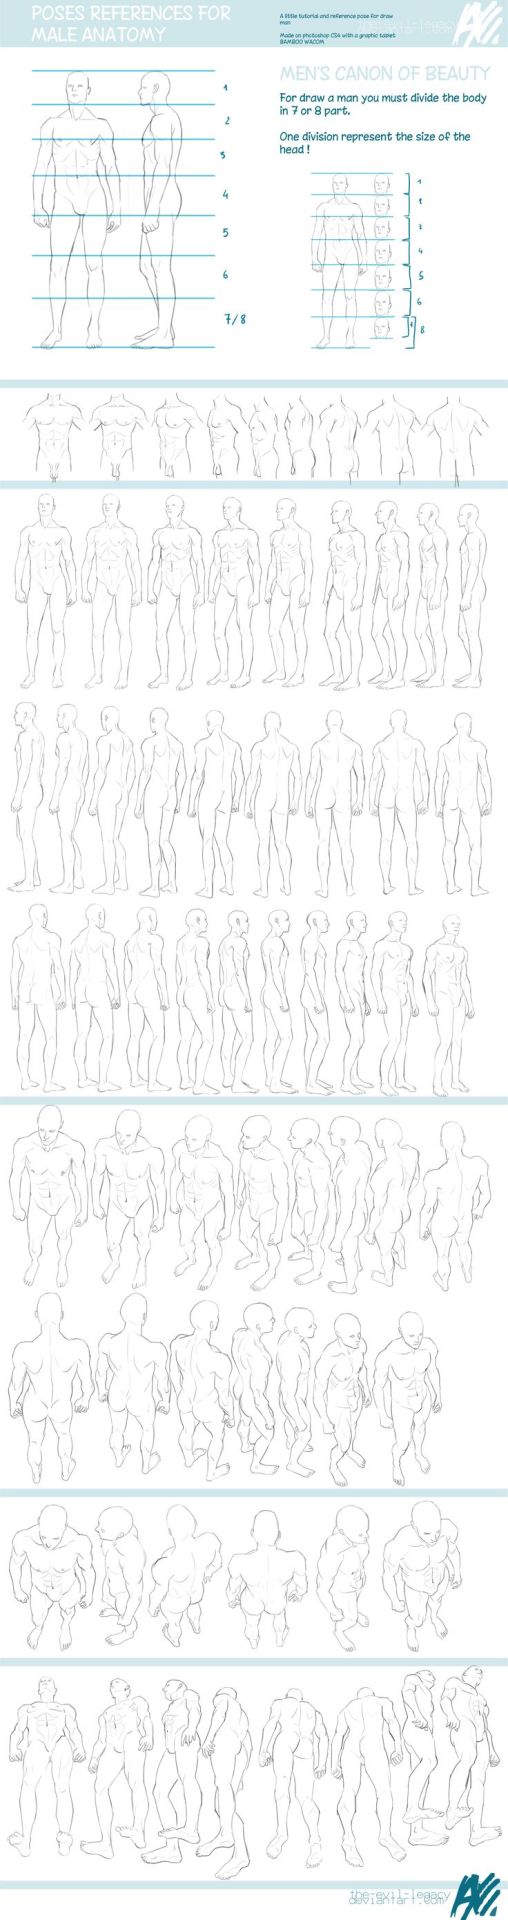
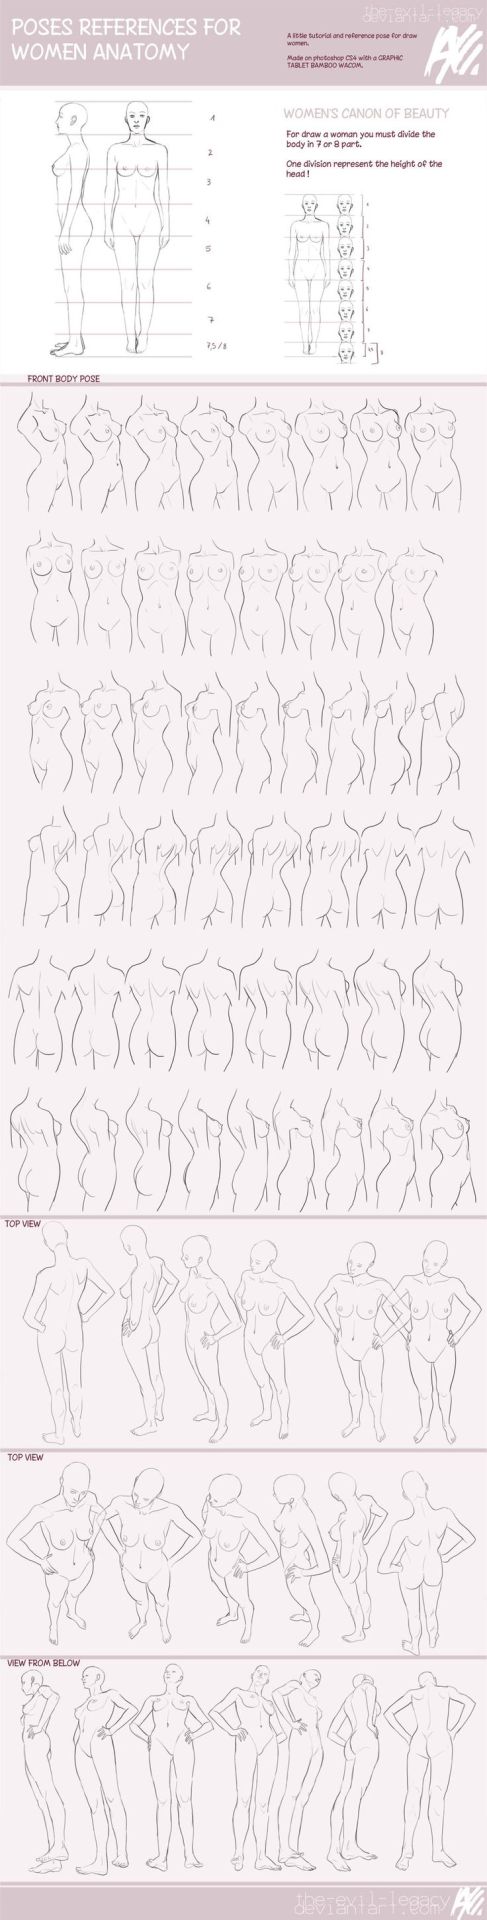
DeviantART – ArandaDill
DeviantART – ArandaDill
More Posts from Aether1984 and Others
Could you please show us how to draw faces with nice fangs please.

Hope this is helpful!
The way you draw men is really good, I noticed in your post where you drew some of the trolls as gems. How do you go about constructing a male body? What's your sketching process? You also give Eridan an interesting face shape to accommodate his glasses. I'm very curious about your sketch process and your art in general!
Thank you!
I scribbled a quick thing to show you how I generally think when I draw… Disclaimer, my style is quite stylized, so in no way is my art accurate to real life nor should be used as a source material for accurate anatomy. 😂 Rather, this is a tutorial on how I conceptualize the human body when I draw it…
Usually when i draw bodies (not just masculine types), I usually conceptualize the torso into three “chunks.” What’s important about how to conceptualize these though, is understanding the volumetric shapes these take on and also where these chunks “end.”
Below is an example of my take of a muscular body type with a strong triangular silhouette. The goal below was to emphasize on a strong, confident, and yet also appealing stature. I also put my emphasis on things I find personally attractive lol \o/

The red area encompasses the general shoulder and breast area.
The green area is an indicator for the rib cage. (In some instances it would be better to draw the rib cage first because breasts overlap the ribcage.)
The blue area encompasses the rest of the stomach area. Technically the pelvic bone rises a bit higher into this area too, but for the sake of simplification to understand the basic shapes didn’t draw it in the above example.
Here’s how it generally applies to some other body types!

I don’t always draw like this sometimes, but i think it’s a good start on how to conceptualize the body into simpler shapes.
Also, for much more lanky body types, I tend to simplify them moreso since they don’t need as much definition on muscle structure.

Please do remember it’s better to understand how to simplify the human body after doing studies of anatomy from real life!! I can’t emphasize enough how important studies are
As for how I draw faces, I’ll save that for topic for a rainy day 😂 Hope this helps!
I struggle INSANELY with doing 3/4 view art. Do you have any tips? I've found a couple guides on pinterest but I'm still having a little trouble.
Hi Anon! So sorry to hear you’re struggling. 3/4th is my favorite comfort zone, but I don’t know how well I can walk you through it any better than the many tutorials out there. There are plenty that do tutorials much better than me and they all kind of follow the same format for 3/4th view, but I’ll try my best to break down my method as understandably as possible!
1: I always start with my eye and middle line guide in whatever direction I want them facing. The middle one is more important than the original eye line.

2: Next I’ll do my head circle to keep my skull guideline and connect it to the bottom of my middle guideline to make the jaw. You’ll want to be kind of careful about this part and not just draw a gigantic circle or one that’s too small. Try to keep it about the size you want your actual head.
Don’t worry too much about the eye line at this point as you’re mostly getting the general shape of your head at this point. You can always edit your eye line later and adjust it to where you need it to be.
If you’re doing a character that has defined cheek bones (Like Vaard who has CHEEK BONES) you can do a line from the side of the head to the side of the chin like I did here that always acts as a great guide to the general area if you’re going to define it.
Make sure this step is on its own layer separate from the rest of your lines.

3: Now using your line and circle guide, go ahead and fill out the far side in whatever shape your character’s face is (angular, round ect.). It’s easiest starting from the top of your brow bone. Keep in mind your center line as this is your direct center of the face.
Vaard’s got a pretty basic, generic face shape as a base. It’s very sharp and square so I did a lot of straight lines with little to no curves to them.
At this point, it’s best to have a reference of a face in the shape you’re going for if you struggle with this step. References are your friend when stepping into unknown territory and angles.
You can also add your hair line guide as well to make sure it’s not too high or too low.
See how the circle we started with now becomes the full skull and makes up the back? This is why we want to be careful about the placement earlier and not go way out of the anatomy you’re going for.

4: Ok now for the fun part. What I like to do, is draw little Star Trek badges under the highest point of the brow you’re going for and on the far side, connect it to the cheek. This becomes your brow/cheekbone on the far side, and your inner eye socket guide on the inside. Don’t worry if they’re too big, you can always erase them later but we’ll come back to these in a bit. You just want the top to be fairly even with each other.

5: So to help line up your eyes in ¾ths view, you can draw a line from each side of the chin or nose. The inner corner of the eyes will usually sit near or close to the same line as the nostril or chin edges. (unless you’re drawing a very narrow or very wide nose, then go with the chin guide lines instead).
My original eye line didn’t quite line up with were I wanted to actually put my eyes but it pretty much lined up with the bottom inside corners so I kept it where it was.
Using the outside ‘Star Trek Badge’ just carry that top line on down and bam, nose bridge perspective!

6: Now using those badge shapes still, you can go ahead and curve your eyebrows right on top of the lines and you have your brows! This really only works if you’re going for a neutral expression though with little to no brow movement or expression.

7: From this point, it’s just a matter of adding your details! You already have a fairly solid base and anything at this point is very easily tweaked or shifted.

8: At this point you can erase all of your guide lines (which should be on a separate layer from your actual face outlines.) and if you happen to have a character with fairly deep set eyes, you can use those badge guides again to shade the eye sockets. Just shade inside them and you have some decent shadow guides.

I hope this helped some! Sorry if it looks like most other tutorials and guides out there, but I did my best. Remember, references are your friend when doing angles you’re not familiar with, even if it’s taking a picture of your own face just to see where shadows fall or how the nose looks at that angle! (The other eye is also the worst. I am in no position to give tips on the other eye, sometimes I don’t even draw it lol).
Best wishes and wishing you the best of luck as you learn to draw in ¾ths! It’s one of the most fun angles to draw once you get the hang of it!
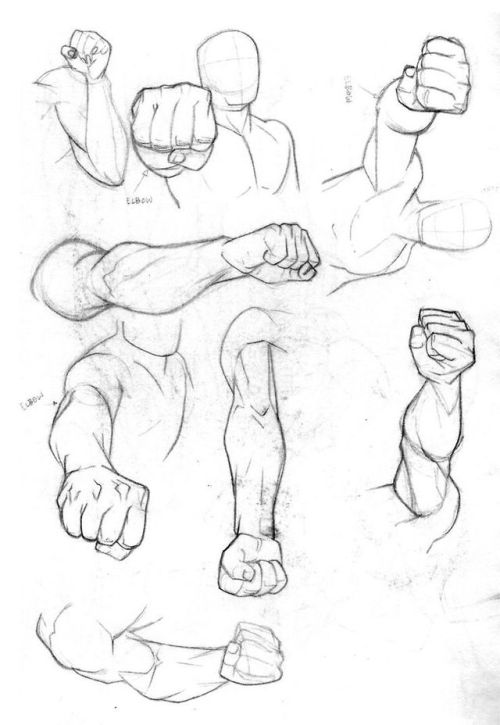
Would you perhaps do a tutorial on arm muscles? Or at least link a few good ones you know
Arm muscles took me a bit to figure out when I got started out with anatomy. But the layout of the arm’ muscles can actually be simplified a whole lot while still maintaining a rather believable look. So let’s have a look-see.

One of the first tidbits I discovered that really made it click for me - was that the upper arm contra the forearm intersections kind of like a set of chainlinks. Both in the way, they sit statically but also how they move. If a “broad” or “wide” side of one of them is shown, the “narrow” side of the other should be shown in correspondence. If you just keep the rough shape of these two lings in mind - you ‘ll have an easier time remembering the layout of muscles.

Just for kicks. This is roughly how the main bones are laid out in the arm. We have the Humerus, the large bone in the upper arm. This one’s rather dense and thick. Then you got the Radius and Ulna that start at the elbow and then reach into the wrist. When we move our wrist, the two ends attached to our wrist twist around one another. ( Take a look at your own hand, turn it, twist it, You should be able to vaguely feel the slight shift in angle in your elbow ).

So here’s a pretty accurate depiction of the muscle layout in the arm. The most notable muscles ( or at least those most iconic ) are the two large ones on the upper arm ( the Bi- and tri-cep), as well as the brachioradialis on the lower arm.

I’ve gone and simplified the layout accordingly to how I usually consider the layout in my own art. Here we can see the “chainlink” figure again. The bi- and tri-cep forming the “upper” chain link, and the brachioradialis along with the flexor carpi Ulnaris former the “lower” chain link.
The reason I tend to simplify this is that the many extendors and flexors on the lower arm, aside from the two listed - are rarely defined on people who’s muscles aren’t highly defined. And having these two braid into one another is just easier than having to keep track of 5-6 different muscles that feed into mostly the same shape.
On the upper arm: We have the bicep in the palest red, the tricep in the darkest red.
On the forearm: The brachioradialis in the darkest red, and the flexors/ extendors gathered up in the lighter red.

What’s interesting to note is that the flex/ex’ es meet with the brachioradialis kind of cross each other in a V-shape, which opens up into the dent of the elbow and attached - not on line with the elbow- but slightly above it. Attaching this muscle group underneath - or on the line with the elbow was a common mistake I used to do - which contributes to your arms looking like sausage links. But just like any other muscle layout, the muscles of the arms are carefully braided with each other with little areas where no muscles are overlapping or weaving into one another.

llllhttps://www.researchgate.net/figure/Agonist-antagonist-operation-of-the-biceps-and-triceps_fig2_326597252
A brief detour for posing- when the forearm is bend upwards (especially in people with highly defined muscles), you’ll notice that the bi-and tri-cep are compressed and thusly build their mass upwards, which makes this engorged bump. The flex is also visible in non-muscular people, but much less prevalent and rarely anything that one depicts - at least in semi-realism unless they want to emphasize a physical strength with their character.

A quick note on more muscle builds can be found here, https://theredlinestation.tumblr.com/post/185528871950/do-you-guys-think-you-could-give-me-a-tutorial-onand are relevant if your character’s muscles are somewhat defined.
- mod wackart ( ko-fi )


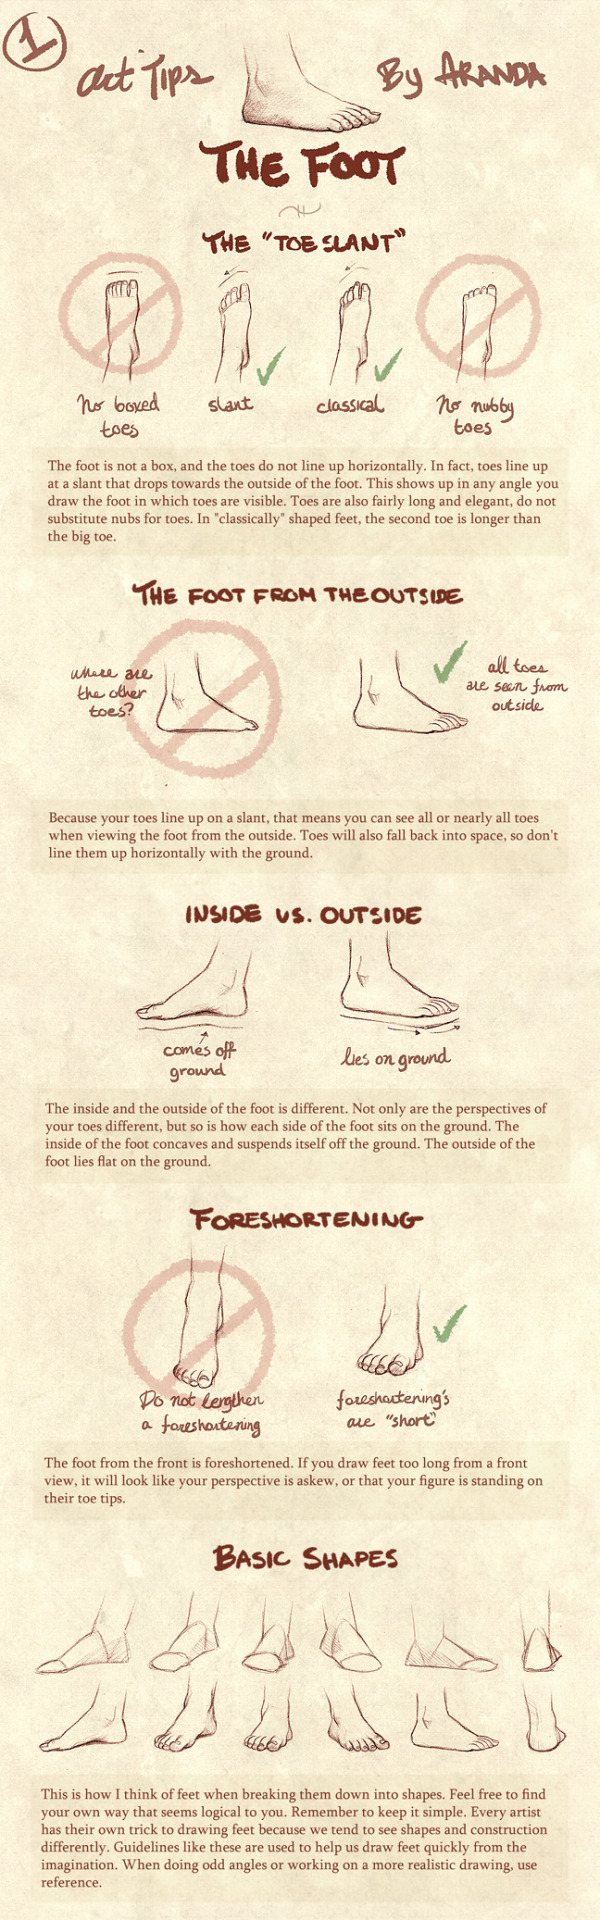
How to draw feet by zephy.fr
Support the artist and follow them on instagram!
A glorious fuck-ton of perspective angle references (per request).
[From various sources.]


Source: The13thBlackCat


disclaimer: I am east asian. if anyone who is not white sees anything wrong with my phrasing, inaccuracies, or insensitivity, or something I missed, please feel free to add on. I’m just one person with one perspective; none of what I say should be taken as The Singular way to draw an Asian character. if you havent done so already, please take the effort to expand your view of Asian culture outside this one tutorial.
if a white person reblogs this and adds something stupid I’m going to bite and kick you like a wild animal
Drawing Heads and Faces: Cheekbones

I’ve found that drawing the head starts to make a lot more sense once you start thinking about cheekbones and cheeks, and how the fit into the head structure.
You might be aware of the Mysterious Indent that Looks Good Next to the Outer Part of the Eye, or the Mystery Indent for short.
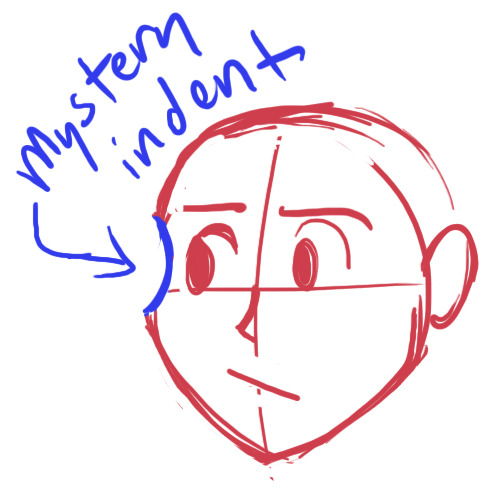
Drawing a Mystery Indent may serve you fine if you only draw the head from flat angles, but it falls apart when you get adventurous.

Why isn’t this making sense anymore?
Drawing a ‘Mystery Indent’ is an attempt to imply cheekbones without knowing how they actually incorporate into the skull, and this is why it looks so unconvincing when you use it to draw the head in anything other than ¾ view.
The cheekbones wrap around the head and eye sockets from above the bridge of the nose. The concave you draw if you draw the ‘Mystery Indent’ is a misunderstanding. There is no concave. You should instead be thinking of this as where the eye socket/brow overlaps the (convex!) cheekbone.


Compare the cheekbones on both sides for placement. They should match up and correspond with each other.
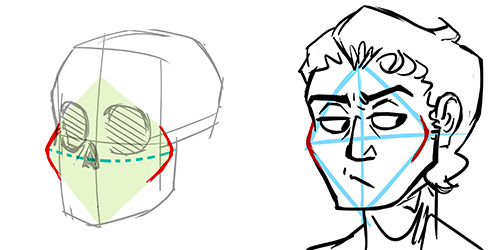
(Knowing cheekbone structure helps when drawing gaunt characters, because their cheekbones may stick out. Remember to compare the cheekbone placement on both sides!)

* This is part of a much larger tutorial I’m working on about head, face, and facial feature structure. Hopefully more to come eventually?
-
 carouselingcircus liked this · 2 months ago
 -
 imjustarandom940 liked this · 3 months ago
 -
 allyprintables reblogged this · 3 months ago
 -
 blueassy liked this · 3 months ago
 -
 chimericalnousse liked this · 3 months ago
 -
 nerdygreenhouse reblogged this · 4 months ago
 -
 archive-of-sorts reblogged this · 4 months ago
 -
 grubbyhomunculus liked this · 4 months ago
 -
 justalittleauthor liked this · 6 months ago
 -
 roboriders liked this · 6 months ago
 -
 saucerkommand liked this · 7 months ago
 -
 pixxxelhotsauce reblogged this · 7 months ago
 -
 pixelhotsauce liked this · 7 months ago
 -
 broekenwing04 liked this · 8 months ago
 -
 decepticupcake reblogged this · 8 months ago
 -
 sayanrougshaban liked this · 9 months ago
 -
 randycatto liked this · 9 months ago
 -
 singerofstorms liked this · 9 months ago
 -
 laterlatertank reblogged this · 10 months ago
 -
 decepticookie liked this · 10 months ago
 -
 aforartistry liked this · 10 months ago
 -
 rebirthresource reblogged this · 10 months ago
 -
 leilaz reblogged this · 11 months ago
 -
leilaz liked this · 11 months ago
-
 mizupanda liked this · 11 months ago
 -
 artking-4 reblogged this · 1 year ago
 -
 goulloynes liked this · 1 year ago
 -
 chanteryuutai liked this · 1 year ago
 -
 hellolonelytorment liked this · 1 year ago
 -
 dirtdirtdirtie reblogged this · 1 year ago
 -
 monsterzz404 liked this · 1 year ago
 -
 mushiboble liked this · 1 year ago
 -
 cydoniartreferences reblogged this · 1 year ago
 -
 toshi-flakes reblogged this · 1 year ago
 -
toshi-flakes liked this · 1 year ago
-
 toast-art liked this · 1 year ago
 -
 coloredmesa reblogged this · 1 year ago
 -
 karacole liked this · 1 year ago
 -
coloredmesa liked this · 1 year ago
-
 algumaideia liked this · 1 year ago
 -
 trapped-neutered-released reblogged this · 1 year ago
 -
trapped-neutered-released liked this · 1 year ago
-
 lukadjo reblogged this · 1 year ago
 -
 angelblingz liked this · 1 year ago
 -
 tenaciouscreative liked this · 1 year ago
 -
lukadjo liked this · 1 year ago